Using Globus Connect Personal
To start using Globus, or to use Globus anytime after install, you can do one of the following:
- Launch the application from your applications menu (ensure Globus is running)
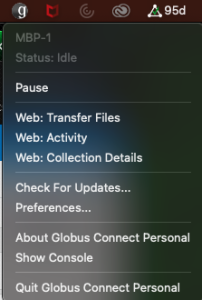
- Click on the Globus Icon from your taskbar and select any of the “WEB” options to launch the Globus interface
- Click on the Globus Icon from your taskbar and select any of the “WEB” options to launch the Globus interface
- Use the Globus CLI from terminal (additional setup required)
- Access from Globus.org
Note: This has proven to be unreliable for data transferring. At this time, it is recommended to use this only when installing the application locally is not an option and that the data transfers are being conducted between machines that have Globus installed, I.E. you are kicking off a transfer from your argonne laptop at home to your GCE home/project directory from a phone or personal laptop whilst sitting at a coffee shop.
Configuring Globus Connect Personal
Click the Globus Connect Personal icon in the main menu bar and select “Preferences…” to configure Globus Connect Personal.
The “General” preferences tab allows you to specify how the Globus icon looks and whether the software should automatically check for updates. “Use black and white menu bar icons” changes the color of the Globus Connect Personal status icon in the menu bar. The “Automatically check for updates” and “Automatically download updates” options determine how Globus Connect Personal should handle availability of a newer version. We recommend leaving the “Automatically check for updates” option selected for automatic notification of important security updates.
Figure 1. General Preferences Tab
The “Access” preferences tab lists accessible directories for file transfer and sharing and provides more control over what information is accessible on your Globus Connect Personal endpoint. By default, your home directory (e.g.: /Users/demodoc) is read/write accessible. The “Deny access to hidden (e.g. security) files in your home directory” option controls whether or not you can access hidden files (i.e. filenames beginning with “.””) in your home directory. By default, Globus Connect Personal does not allow access to files like: ~/.globusonline and ~/.ssh.
Figure 2. Access Tab
Click the “+” icon and select a folder to make it accessible for transfers. To allow the folder to be shared, check the “Sharable” box.
Note: Sharing Folders
To share folders, you must either be a Globus Plus user, or your Globus Personal endpoint must be managed under a subscription.
If you remove everything from the access list, no files will be accessible on your Globus Connect Personal endpoint and you will be prompted to add accessible paths. You can either click “+” and add directories and files, or click “Reset to Defaults”.
The Info tab displays internal configuration information that may be helpful for troubleshooting issues and may be requested by the Globus Support team to assist with any resolution.
Figure 3. Info Tab
NOTE: This is a point-in-time reference from Globus.org. If this does not match your experience after install, please check here for the most recent configuration settings.


